Showing posts with label Halloween. Show all posts

Sunday, September 23, 2012

Pumpkin Cheesecake Muffins

Mmmmm..... I had been thinking about making pumpkin bread, pumpkin muffins, pumpkin mousse, etc. etc. for a while now.  Fall is finally here.  Our leaves have begun to change in upstate NY and the weather at night is getting cooler.  The sweater and riding boots have come out and I am ready for PUMPKIN!  I bookmarked and pinned A LOT of recipes, so I pulled up the first one I saw and made them today.   I don't know if I need to move on in the list of pumpkin recipes.  This one is so good and so easy that I think I will make it again!

Check these out!


The swirl of the vanilla cheesecake mixed in lightly with the spicy pumpkin batter is a perfect mix of fall goodness!  I found this recipe on instructables.com. If you are comfortable with just following the recipe, you can check mine out.  I made a few changes to the recipe and it turned out perfectly, so I will tell you that I tried to make them a little more healthy and used whole wheat flour rather than white.  I also replaced the white sugar with brown just because I had no white sugar on hand and it was delicious!

Here is a link if you would like to see the STEP by STEP tutorial. 

Here is the recipe as I made it.

Pumpkin Muffin

1- 15 oz can pumpkin
1/4 cup canola oil
2 jumbo eggs
1 cup dark brown sugar
1 tsp vanilla
1-1/2 cups whole wheat flour
1 tsp baking powder
1/2 tsp baking soda
1/2 tsp cinnamon
1/2 tsp ground ginger
1/2 tsp nutmeg
1/8 tsp ground cloves
1/2 tsp salt
1/4 tsp freshly ground black pepper

Filling

8 oz cream cheese at room temperature
1 jumbo egg yolk
5 tbsp sugar
1/2 tsp vanilla extract

Preheat oven to 350 degrees.

Mix pumpkin, oil and sugar together on low.  Add in eggs and vanilla and mix in.  Mix dry ingredients into wet ingredients.  Combine thoroughly and scrape the sides of the bowl until well combined.

Make the filling:

Mix together cream cheese, sugar, egg yolk and vanilla until combined.

Assemble:

Line your muffin tins with paper cups (or grease your muffin tins if you don't want to use paper cups).  Drop in spoonfuls of pumpkin mixture to fill about 1/2 way.  Add smaller spoonfuls of cream cheese mixture to top to fill the cup to about 3/4 full.  Use a skewer or spoon handle to swirl.

Bake:

Mini muffins:  20-25 minutes
Standard muffins:  25-30 minutes
Jumbo muffins:  30-40 minutes


Photobucket

Saturday, October 22, 2011

Free Halloween Printables

Hello, Friends!  I wanted to take the time to make new cupcake wrappers this year, but I haven't had time, so I am reposting these from last year.  Just right click on them to print.  I tested this and it worked on my computer.

Witch hat toppers!  Just add a toothpick and stick into your cupcake icing.

Cute cupcake toppers... same thing.  Add a toothpick and stick.  These are larger than this when printed out.

If you would like to see my cookies from last year, pop over to this page to see them all plus get some tips on where to find the decorations for cookie baking.

and if you need a cute party appetizer for that great Halloween bash you or a friend is having, check out these mini-cheeseball appetizers.


I hope you have a spooky Halloween!
Photobucket

Tuesday, November 2, 2010

Mini Cheeseball Pumpkin Appetizer


Awe... aren't they sweet?  These are such a simple appetizer that anyone can make them!  They were a big hit in both flavor and  cuteness.  Because I had some very picky eaters eating these, I made some {the darker pumpkins} with a spicy mixture on top, but I also made some plain for those who don't like things spicier.

Mini Cheeseball Pumpkin Appetizer

8 oz block of cream cheese
6 oz finely shredded orange cheddar cheese
sesame stick snacks
Equal parts {approx. 1/4 tsp each}
paprika
chili powder
ceyenne pepper
cumin
black pepper
Mini toasts or crackers

Mix 8 oz cream cheese with 3 oz orange cheddar in your mixer bowl.  Roll 1 tsp (more or less depending on the size you'd like) of the cheese mixture into balls.  Roll all of the balls in the remaining shredded cheddar to coat.  Roll half of the balls in the spice mixture to create the darker, spicier pumpkins.  Place one sesame stick into each pumpkin to create a stem & flatten the ball slightly.  Serve on small toasts or crackers.

These are the mini toasts I used.  So adorable!

Whole Wheat Mini Toasts (3.1 ounce)Whole Wheat Mini Toasts (3.1 ounce)

Photobucket

Friday, October 8, 2010

Free Halloween Cupcake Wrappers and Toppers

Halloween is in the AIR!  I'm totally stoked to get my Halloween stuff out and start decorating.  Maybe tomorrow morning!  If I do, look for the post on my other blog... Pixeltrashamania.  For directions on how to print and cut out these cupcake wrappers, go under the header labeled "Cupcake Printables" above. You will also find LOTS more freebie cupcake wrappers.  If you use these, please send me an email with pictures!  I'd love to see!


 Cupcake toppers.  Just glue to a toothpick and stick them into your icing!

More traditional toppers to glue/tape to toothpicks and top those cupcakes cutely!

May I also suggest? 
This stand would be perfect for these Halloween cupcakes!

I'd love to make these chocolate covered pretzels look like theirs (probably couldn't!) and stick them in the tops of the cupcakes as cupcake toppers.

Or how about these guys stuck right into the icing and sticking out of the cupcakes with the cupcake wrappers on them?  Cute!


Oh... and if I only had the MONEY... check this out! I love a cake stand and this one would be AWESOME!!!


Photobucket

Wednesday, November 11, 2009

How to Make Flood-filled Sugar Cookies with a No Egg Icing- Halloween Cookies

Ok... now.... I'm about to make an obvious statement!

Sugar cookies are so fun to make and decorate! You can make this beautiful, shiny icing with very few ingredients and then decorate away.  This icing gets hard and stays shiny for days.  The only downfall is that after about a 2 weeks or so, the sugar can start to crystalize and make crystal shapes in the icing.  I haven't figured out the problem with this yet, but in most cases the cookies don't stick around that long.  It did make an awesome design in my snowflake cookies! 

I have a huge collection of decorative candies for on top of my cookies. I find them at Michaels, WalMart and at specialty cake shops. One of my favorites that I used this year is the edible glitter. It consists of huge chunks of shiny sugar that looks adorable on the cookies. You will notice it on a few of the black cats below. Also, the sugar eyes were fun to play with. I found those at a cake shop in San Diego and hope they still have them because I've used all of mine.
I did find them at this shop online though. I need to order some more.

Another awesome product (especially if you can't find sugar eyes), is this one. They are pearls made of sugar. Very fun to use for polka-dots or eyes.  If you click on these pictures below, you can see them close up.  See how shiny they are? These are dry, but still shiny.

See the edible black glitter? So cute!


When decorating with Royal Icing, you find that some people can't have raw egg whites and the meringue powder in other recipes is expensive and hard to find in some areas (like ours). But I have a secret! I found a wonderful icing recipe on Wilton that I have been using that works JUST like Royal for flood filling on cookies. I just use less liquid for piping the outlines and more for the flooding. If you get it too runny for the piping, you add more powdered sugar. If it is too thick, add more corn syrup.
I use a regular icing bag and tip #1 or #2 for my piping around the outside. Then I either use a zip-lock bag with a corner snipped or a diposable piping bag to flood fill. You can cut the end off so that the icing flows the way you like. Start with a tiny hole and work your way up to a bigger one. A hole that is too big is really not good!

I wish I had taken some pictures of my set-up so you can see how I do it, but I forgot. Next time! I will edit this post and put the pics in. For now, however, picture this.

I use a lazy susan and fill it with baked cookies. I use the thicker icing and pipe all around the edges of them with white. I keep doing this in batches until all cookies are outlined. That's the hardest part.

Next, I make my thinner icing and color batches. I put them into the disposable bags and stand each bag in a drinking glass. This contains the mess that you are sure to make because the icing flows easily out of the bag.
Next, pick the cookies that you would like to have flooded with the same color. Slowly squeeze some icing on the cookie and use the tip of the bag to spread it out to the edges. Be careful not to squeeze too much or it will go out over the edges. If you want to include two colors that blend, do so now. Fill one part of the cookie with one color, stop and fill the other half with another color. You can swirl it with a toothpick so that the colors blend together. You can make polka-dots or any other design in another color as well, but be sure you don't put on too much of the original color or it will over-flow the edges of the cookie when you add the second color.

Now you can add all kinds of nonpareils, jimmies, confetti, etc. to make the cookies look adorable. Put them on while your icing is still wet.

Once that original layer gets a little hard (5-10 minutes), you can take your thicker icing and use
it to make some swirls or dots or stripes that will look 3D on top of the icing.

Here is the Wilton recipe for the icing. When I thin it, I use corn syrup rather than milk.  If you use milk, it can cause it to crystalize after it dries.  (This was edited because my icing was crystalizing and a reader of this blog suggested I use corn syrup rather than milk to thin the icing because the milk is what was causing it to crystalize!  Turns out she was totally correct and I haven't had a problem since!  So thank you to my reader!!!) This icing dries smooth and hard, like royal icing, so you can add on other decorations and piped details.

Ingredients:

5 cups confectioners' sugar sifted
1/4 cup milk
1/4 cup light corn syrup
Makes: About 3 cups of icing.

Instructions:
Place sugar and milk in bowl. Stir until mixed thoroughly. Add corn syrup and mix well. For filling in areas, use thinned icing (add small amounts of light corn syrup until desired consistency is reached).


For the cookies, I use a basic sugar cookie recipe from Martha.

Ingredients
Makes 2 dozen
2 cups all-purpose flour
1/4 teaspoon salt
1/2 teaspoon baking powder
1/2 cup (1 stick) unsalted butter
1 cup sugar
1 large egg, lightly beaten
2 tablespoons brandy, or milk
1/2 teaspoon pure vanilla extract


Directions
Whisk together flour, salt, and baking powder in a medium bowl. In the bowl of an electric mixer fitted with the paddle attachment, cream butter and sugar; add dry ingredients, and mix until incorporated. With mixer running, add egg, brandy (or milk), and vanilla; mix until incorporated.


Transfer dough to a work surface. Shape into 2 discs, cover with plastic wrap, and refrigerate for at least 1 hour.


Preheat oven to 350 degrees. Line baking sheets with nonstick baking mats or parchment paper; set aside.


On a lightly floured work surface, roll out dough to 1/8-inch thickness. Cut into desired shapes, and transfer to prepared baking sheets, leaving an inch in between. Leftover dough can be rolled and cut once more. Bake until lightly golden, about 10 minutes; do not allow to brown. Transfer to wire racks to cool.
Have FUN!

Friday, March 13, 2009

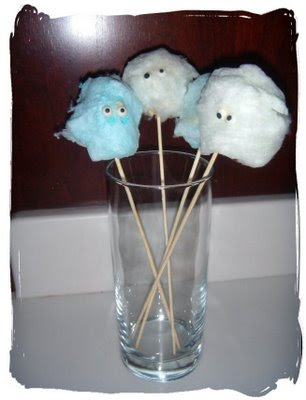
Fluffy Monster Pops!

ooooo... I found the cutest idea at Conversation with a Cupcake. I, of course, couldn't create a pink fluffy pop. I am after all the mother of two boys. So, I had to change the idea and turn them into "Fluffy Monster Pops". My guys were happy to find them on the table when they came home from school today. This is an easy and great after school treat! If you want to see how they're made, go to the link above and see what it is like to have a converstation with a cupcake! Her site is adorable!


Blog Widget by LinkWithin